
A backyard shed can be more than a place where stuff goes to disappear. With a little planning, it becomes the calm center of your yard: a spot where raised bed gardening stays easy, power tools stay safe, and you can actually find what you need without stepping over everything else.
This kind of Shed Organization isn’t about having a huge building or matching storage bins. It’s about layout. Where your tools live, where you stand to work, how you move between the shed and the beds, and how to keep the mess contained so the rest of the yard still feels peaceful. Even if you rent, share the space with kids, or have a small shed that fills up fast, the right setup can make it feel intentional instead of crammed.
Start With a “Garden-to-Shed” Path That Stays Clear
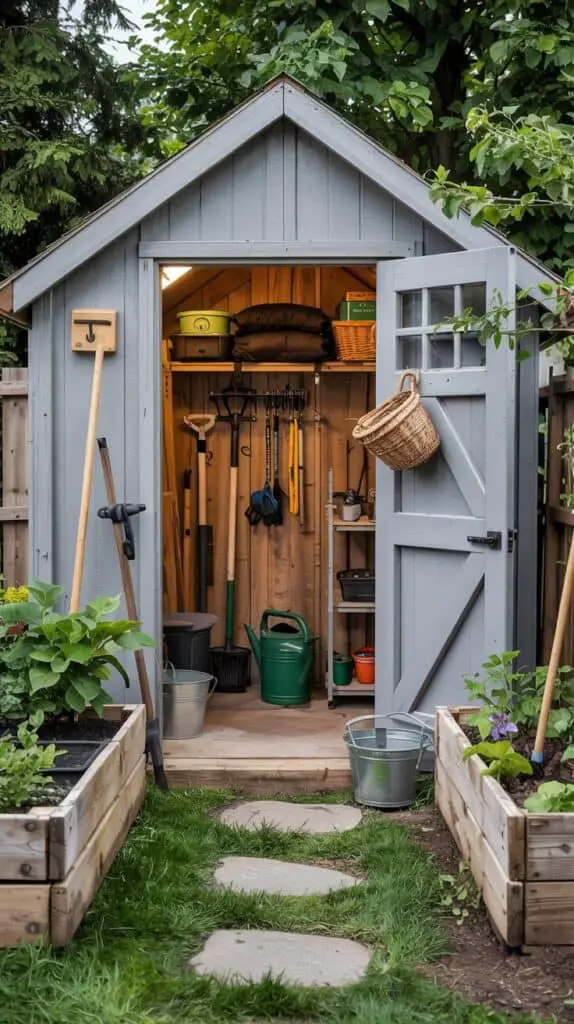
Before you hang a single hook, decide how you’ll move between your raised beds and the shed. This is the part people skip, and it’s why the shed ends up becoming a dead end instead of a helper.
Pick one door as your main “garden door.” If your shed only has one, that’s fine—just treat the area inside that doorway as sacred. Keep a clear path from the door to the tools you use weekly: hand trowel, pruners, watering can, gloves, and whatever you use to plant and harvest. The goal is to be able to walk in, grab things, and walk out without moving a stack of stuff first.
If you’re building beds close to the shed, leave a small standing zone outside the door—just enough room for a harvest basket or a potting tub. Even a couple of pavers or a narrow gravel strip makes the transition feel clean. This one layout choice supports both Garden Shed Organization and your gardening rhythm, because it keeps the shed useful during busy seasons instead of frustrating.
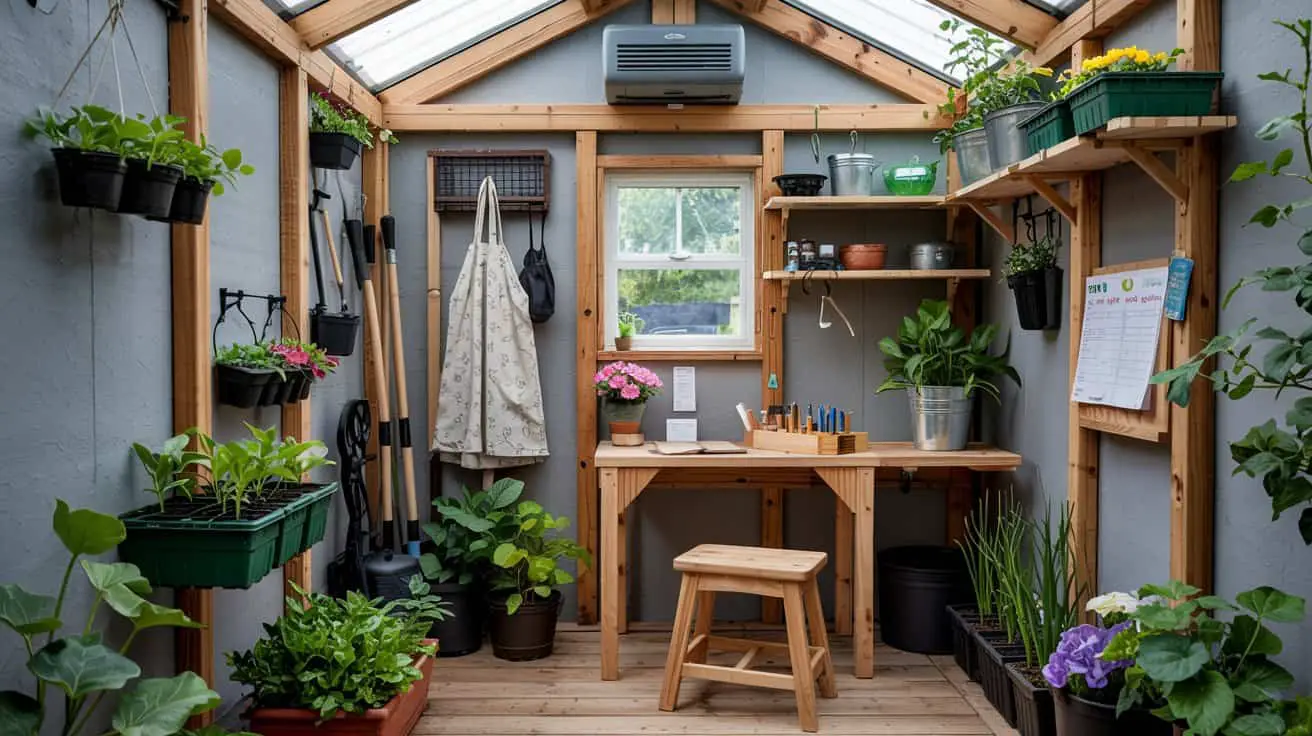
Build a Simple Potting-and-Prep Zone Without Taking Over the Shed
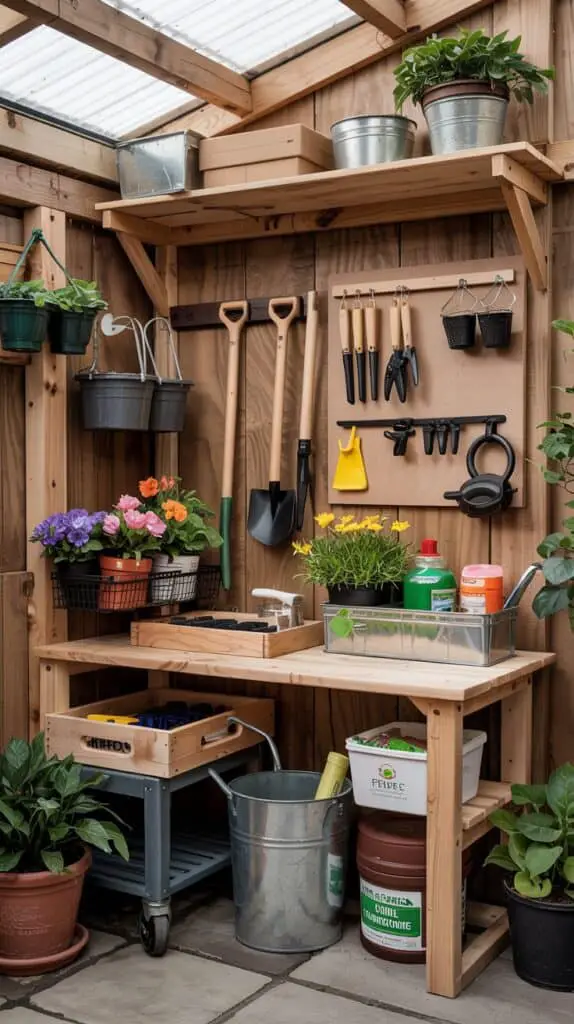
You don’t need a full potting bench to get the benefits of one. What you want is a place to set things down that isn’t the floor, and a surface that’s easy to wipe clean.
A narrow counter along one wall works beautifully. It can be as basic as a sturdy shelf at waist height with a board on top. Above it, hang a small pegboard or a row of hooks for hand tools, twine, plant labels, and snips. Below it, keep one tote for potting supplies and one lidded bin for messy items like fertilizer or extra soil amendments.
If you’re in a rental or you don’t want to drill, lean into freestanding solutions: a metal shelving unit with a wood top, a rolling cart that tucks under a shelf, or an over-the-door organizer for small items. This is one of those Shed Organization Ideas Diy setups that looks tidy because it creates a defined “work” area without needing built-ins.
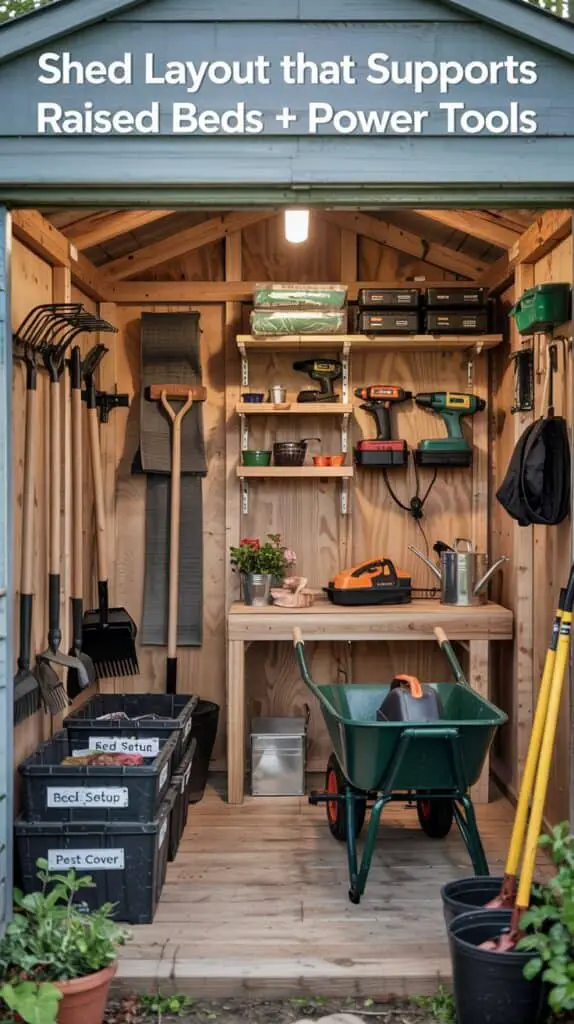
Use a Two-Zone Layout: Dirty Gardening on One Side, Power Tools on the Other
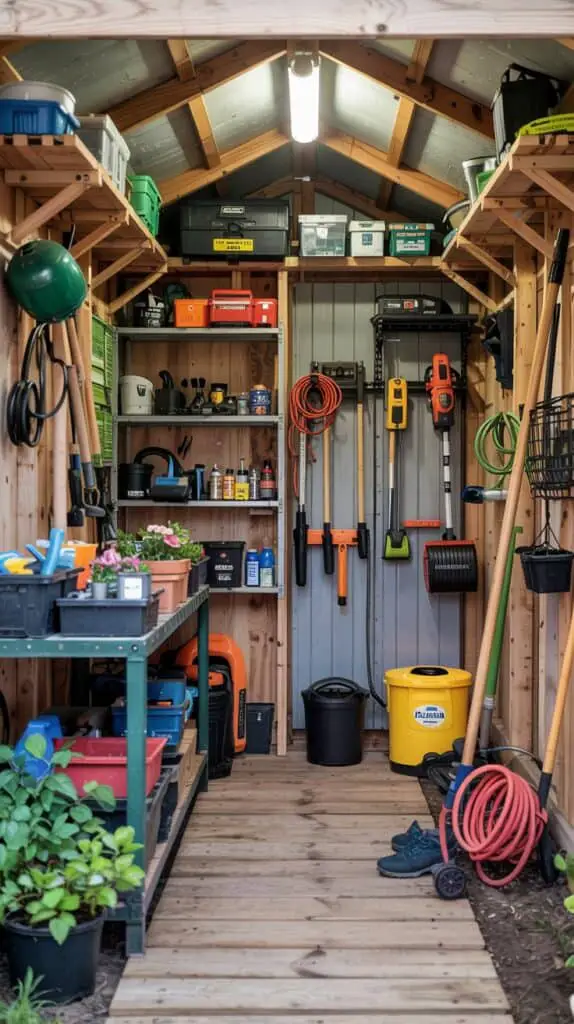
If you do one thing for Organize Shed Ideas, make it zoning. Mixing garden mess with power tools is how cords get tangled, blades get dusty, and everything feels chaotic.
Split the shed into two lanes:
- A gardening lane for soil, pots, hoses, fertilizers, and anything that can handle dirt
- A tool lane for power tools, batteries, chargers, and hardware
Even in a small shed, zoning is possible. One side can be a vertical tool wall plus a narrow shelf, while the other side handles gardening bins and a potting surface. The visual calm is immediate because you stop seeing every category at once.
This is also safer if you have kids or pets. Your power tool lane can be higher up and more contained, while the garden lane keeps frequently used items accessible without climbing or digging around.
Create a “Charging Station” That Doesn’t Become a Cord Nest
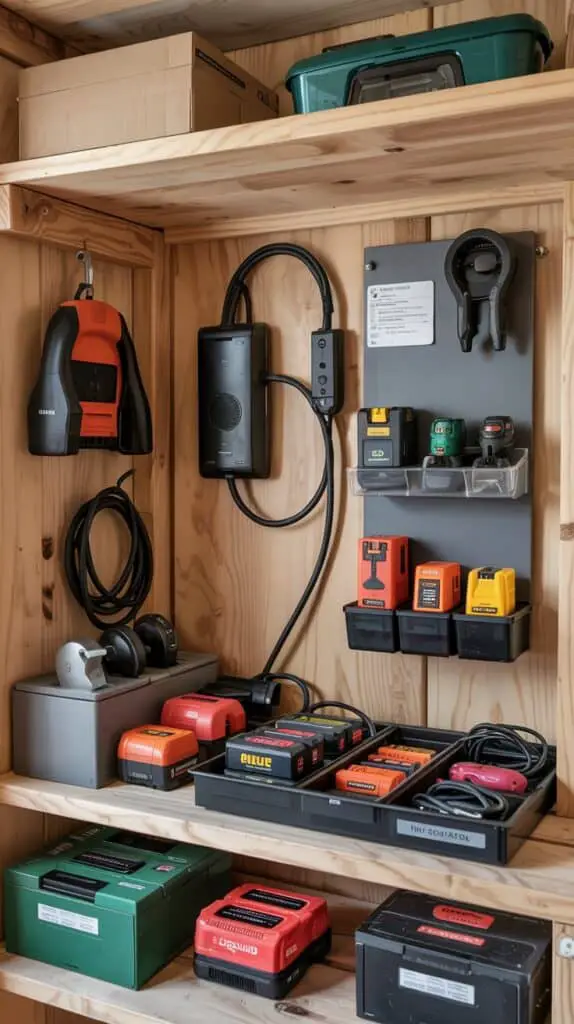
Power tool storage gets messy fast, mostly because chargers and batteries spread out like they’re trying to escape. A dedicated charging spot keeps everything together, and it helps you notice when something’s missing.
Pick one shelf near an outlet (or near where you can safely run a heavy-duty extension cord). Place a power strip with a mounted surge protector on the wall or on the side of a shelf. Then keep charging items only in that zone: batteries, chargers, and the tools that need them.
Add a small bin for extras like drill bits, driver heads, and safety glasses. Labeling helps, but you can also keep it simple by using shallow trays—one tray per tool family. This layout borrows from Garage Organization Ideas, where the goal is to keep tool systems together so you’re not hunting for the one piece you need.
If your shed isn’t climate controlled, avoid leaving batteries in extreme heat or cold. Store them in a small insulated bag or bring them inside during harsh seasons, while still keeping chargers and accessories grouped in the shed.
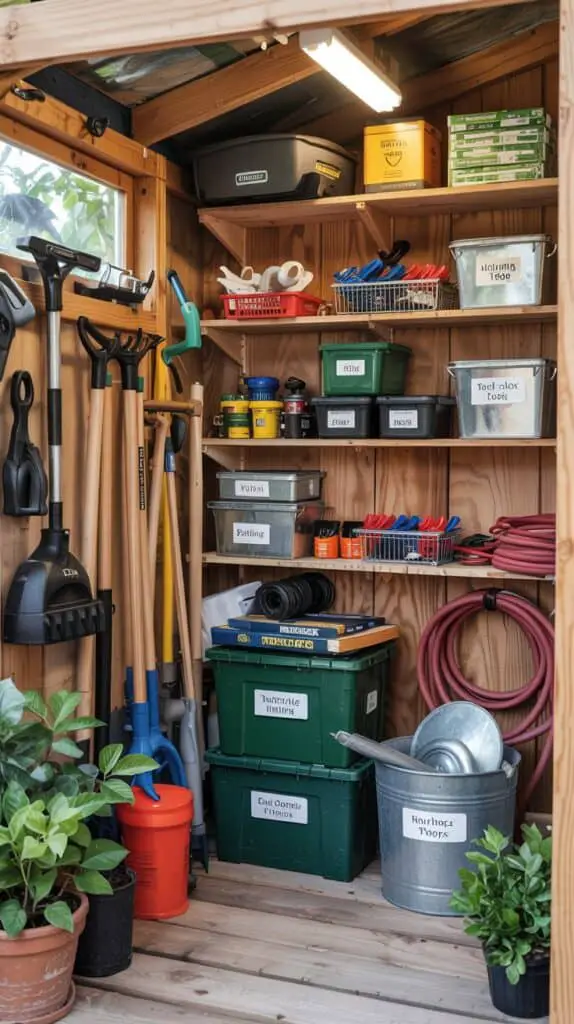
Make One Wall a Vertical “Long Tool” Wall
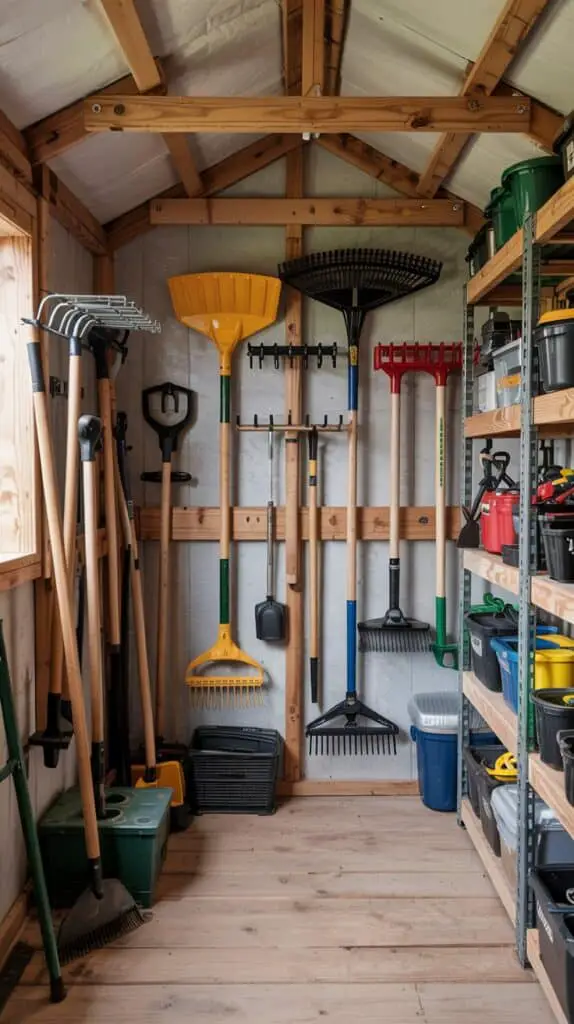
Rakes, shovels, hoes, and brooms are the fastest way to lose floor space. The easiest fix is to dedicate one wall to long tools, and keep them off the ground completely.
A simple rail with hooks works well, or individual tool clips spaced out so tools don’t overlap. Keep the most-used tools in the center at easy reach, and the seasonal ones higher up.
If you need this to be renter-friendly, you can:
- Use a freestanding rack that leans against the wall
- Use tension rods inside the shed to create hanging points
- Use a tall shelving unit and attach tool clips to the sides instead of the wall
This is a core move in Shed Organization: it clears the floor, and the shed instantly feels bigger even if nothing else changes.
Store Garden Bed Supplies by Task, Not by Category
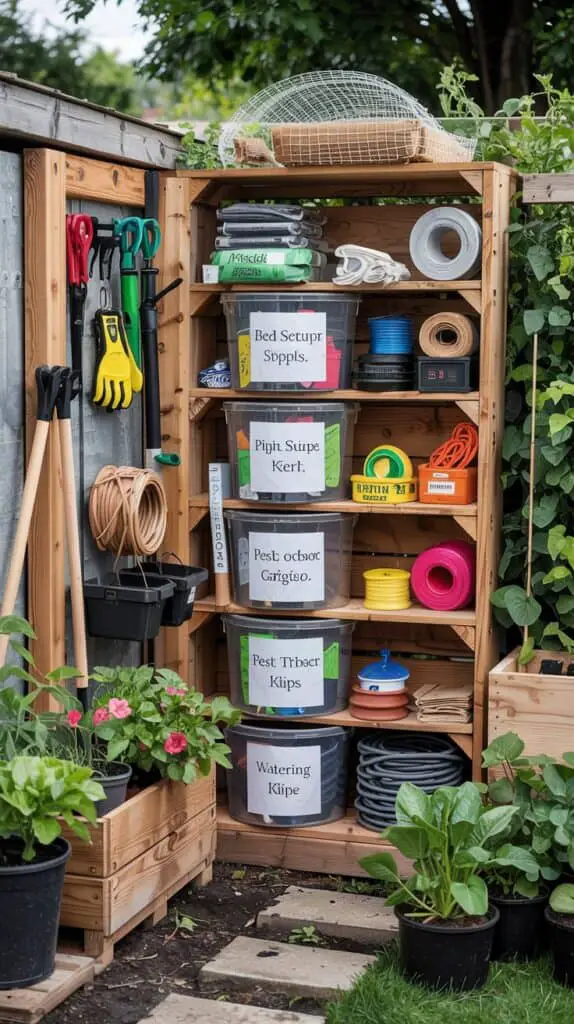
Raised bed gardening comes with its own mini ecosystem of supplies—netting, hoops, clips, plant supports, drip lines, row cover, and random “I’ll need this later” pieces. If you store these by category, you end up with ten half-bins and a lot of digging.
Instead, store by task:
- Bed setup kit (landscape fabric pins, measuring tape, gloves, twine)
- Plant support kit (stakes, ties, tomato clips)
- Pest protection kit (row cover, hoops, netting, clamps)
- Watering kit (drip parts, repair connectors, spare washers)
Use lidded bins so things don’t spill and get dusty. Label them simply. If you’re short on space, use stackable bins and keep the most seasonal ones lower so you can rotate them.
This makes the shed feel calmer because you’re not seeing a hundred small items. It’s also more practical because when you’re working in the beds, you can grab a single bin and carry it out.
Add a “Drop Zone” for Real Life Stuff You Actually Use
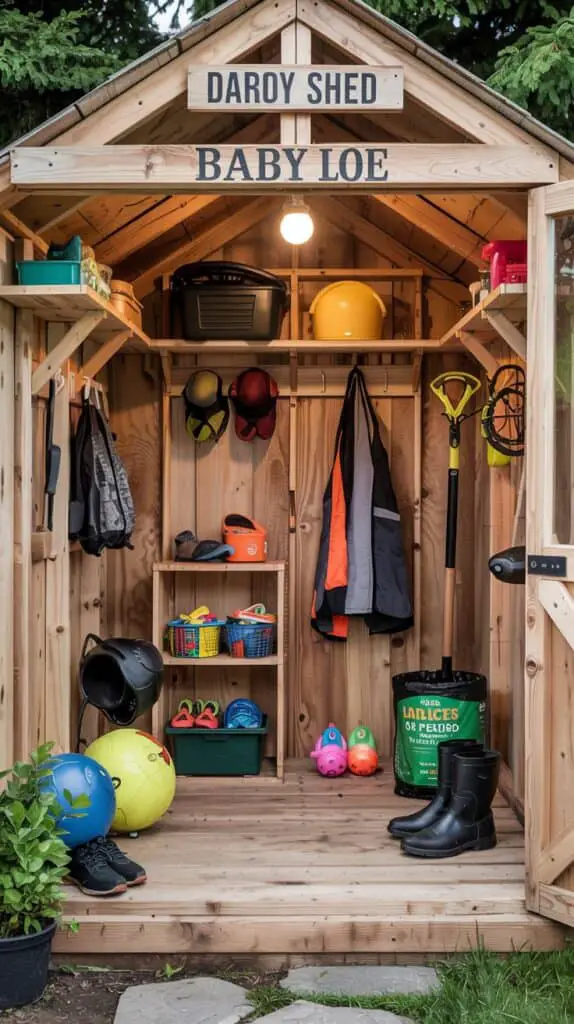
Most sheds fail because they don’t account for real life: the muddy shoes, the kids’ outdoor toys, the dog leash, the soccer ball that ends up in the garden, the half-used bag of grass seed.
Instead of fighting it, give it a small, controlled home. A drop zone might be:
- One open basket for gloves, hats, and quick-grab items
- A low shelf for a couple of outdoor toys
- A hook for a leash or a garden apron
- A bin for seasonal kid gear like bubbles or sidewalk chalk
This is where Studio Shed thinking helps, even if your shed isn’t fancy. Studio shed spaces work because they plan for daily behavior. When you design a shed layout that expects life to happen, it stays tidy longer without constant resetting.
Use the Door Area for Flat Storage and Lightweight Items
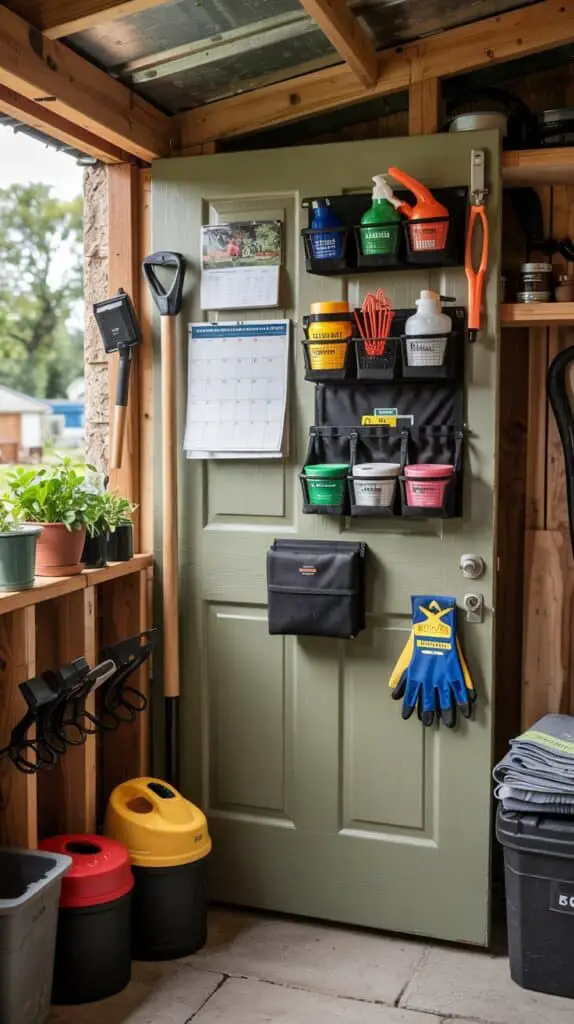
The back of the door and the wall space right beside it are prime real estate, especially in smaller sheds. This is where you put flat and lightweight items that don’t deserve a whole shelf.
Good door-area items include:
- Hand tools in an over-the-door organizer
- Small spray bottles (store empty or secure them carefully)
- A calendar or simple seasonal checklist
- Lightweight kneeling pads
- Seed envelopes in a small container (if temperature allows)
This is also a smart place for a slim first aid kit and a pair of work gloves. It supports Shed Organization without adding clutter because it uses space you otherwise ignore.
Keep the Center Floor Mostly Empty on Purpose
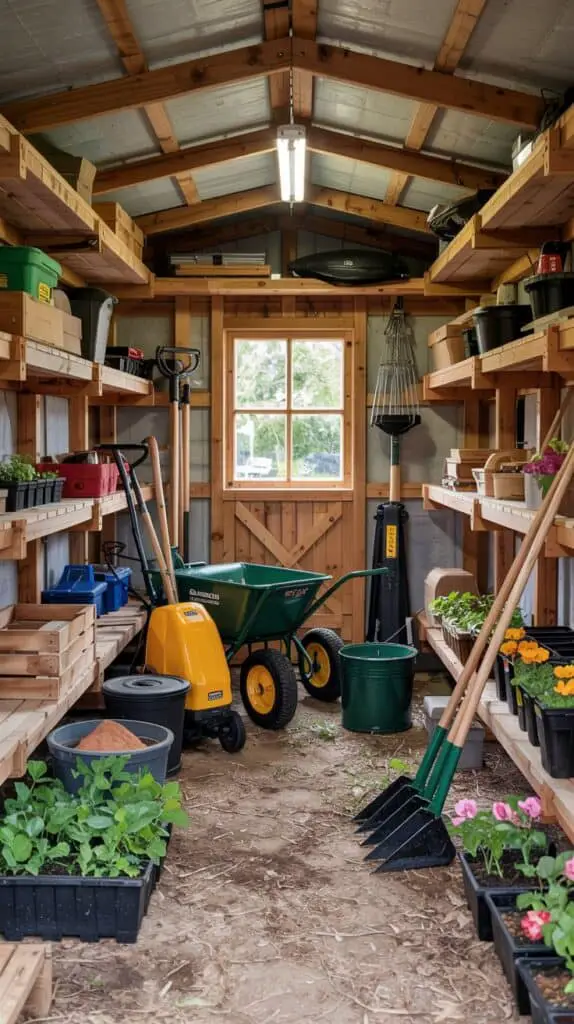
It’s tempting to fill every inch of the shed, especially if storage is tight. But the most functional shed layouts usually protect a small open area in the middle. That open area is your turning space, sorting space, and “I just need to set this down” space.
If you have raised beds, you’ll be carrying awkward things: trays of seedlings, a bag of compost, a bucket of weeds, harvested produce. A clear floor makes it easier and safer.
If you need to store one large item like a mower or a wheelbarrow, park it along one wall and build your layout around it. The mistake is letting large items drift into the center. Decide their parking spots and keep them there.
This is one of the simplest Organize Shed Ideas that has a big payoff: the shed stays usable instead of becoming a storage pile you avoid.
Make Seasonal Rotation Part of the Layout, Not a Special Project
Shed layouts break down when seasonal items don’t have a planned home. Holiday décor, patio cushions, leaf blower, seed starting trays—these things arrive and take over because the layout didn’t expect them.
Designate a top shelf (or the highest zone of shelving) as seasonal storage. Use a few consistent bins and rotate them twice a year:
- Spring/summer: garden-heavy items at reach level, winter items up high
- Fall/winter: leaf and snow items at reach level, garden extras up high
If you have raised beds, your busiest shed months are often spring planting and late summer harvesting. Keep those supplies easiest to reach during those seasons.
This approach is budget-friendly because it doesn’t require more storage—just smarter placement. It’s also calmer because you’re not shuffling everything constantly.
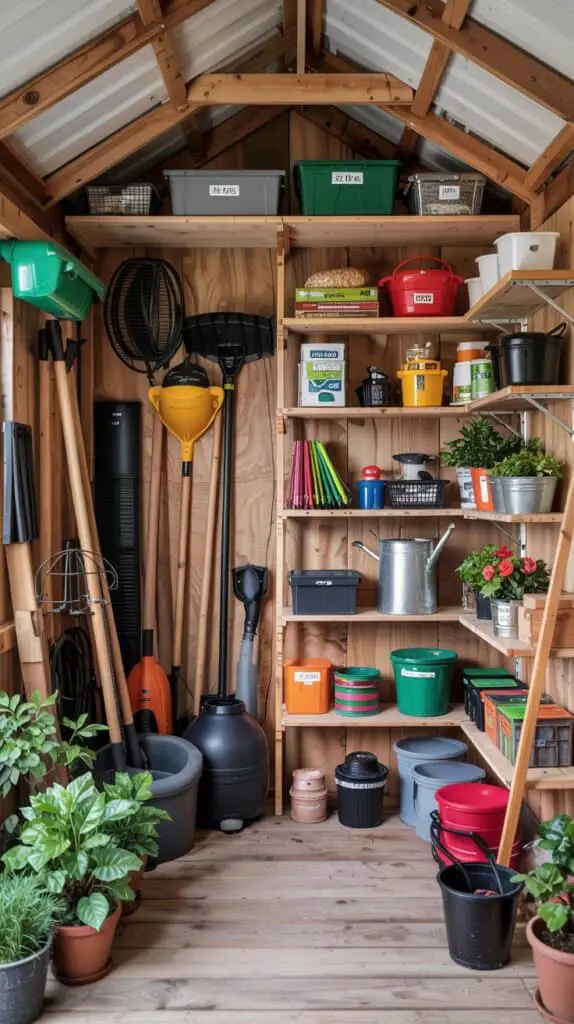
Use Shelving That Matches What You Actually Store
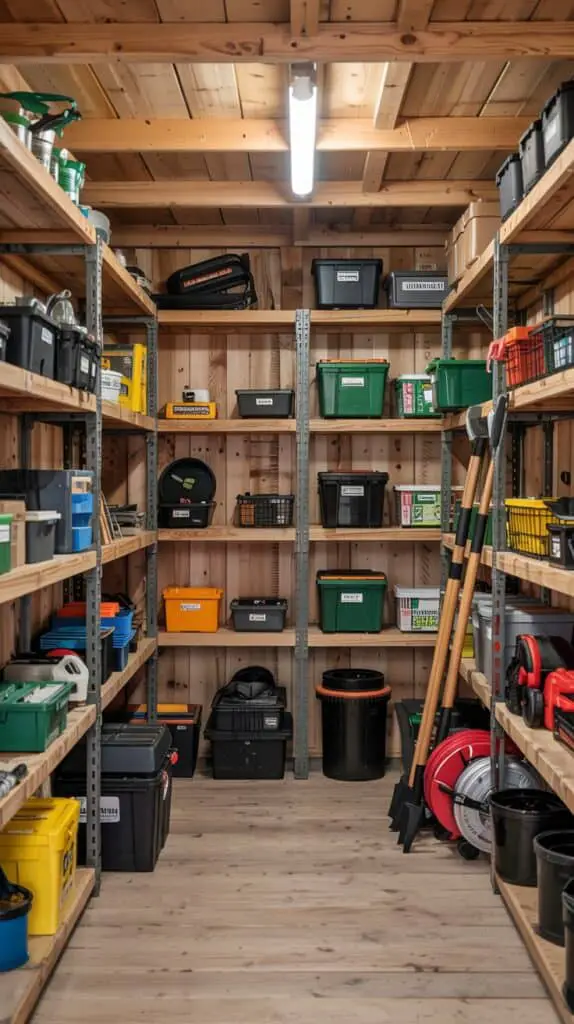
One reason sheds feel cluttered is shelving that doesn’t match the items. Shallow shelves waste space for deep bins. Deep shelves become black holes. The fix is choosing shelf depth based on your storage style.
For gardening bins and power tool cases, medium-depth shelving is usually best. You want bins to sit fully on the shelf without hanging over, and you want to be able to pull them out without scraping your knuckles.
If your shed is narrow, consider shelves only on one side to preserve walking space. If your shed is wider, you can do shelves on both sides and keep a clear aisle down the middle.
This is where Garage Organization Ideas can be borrowed without copying the look. Garage systems often prioritize visibility and easy access. You can apply the same logic with simple shelving and a few bins, keeping the shed visually intentional rather than stuffed.
Plan a Small “Quiet Corner” If You Want the Shed to Feel Like a Studio Shed
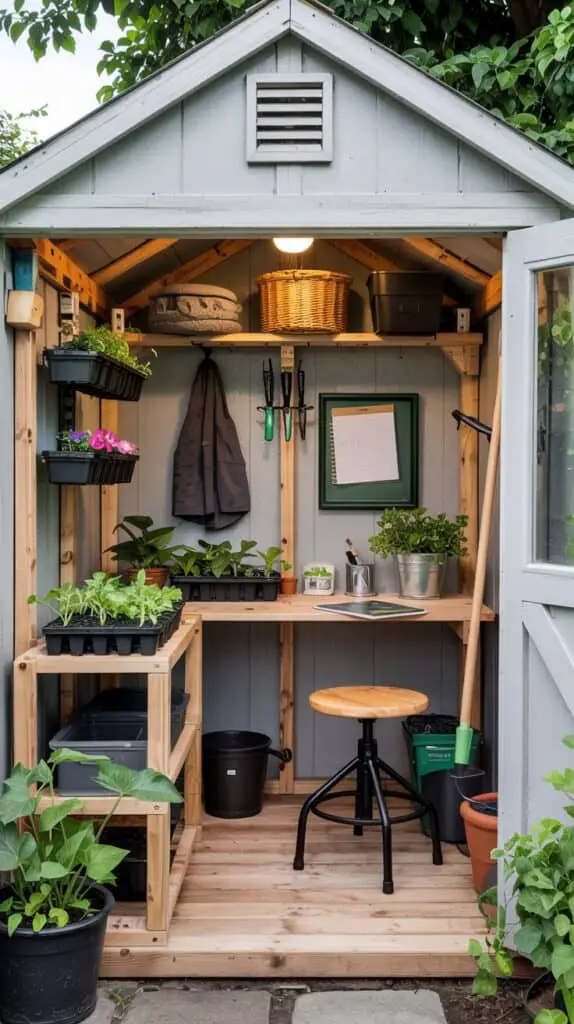
Not everyone wants this, but if your board vibe leans toward calm backyard spaces, a shed can support that too. A Studio Shed doesn’t have to be a full office. It can be a small corner that makes the shed feel less like a utility closet.
This might look like:
- A small stool and a narrow counter where you can repot seedlings
- A clean hook for a garden apron
- A simple basket for harvest scissors and twine
- A spot for a notebook or plant labels
The key is that this corner stays uncluttered. It’s the “reset point” for the whole shed. When everything else feels a little messy mid-season, you still have one tidy surface that makes you feel like you can catch up.
If you have a small shed, the quiet corner might just be one clean shelf. That still counts.
Set Up a “Return System” So Things Don’t Drift
The real magic of Shed Organization isn’t the initial setup—it’s whether things go back. Make returning items easier than leaving them out.
A few practical tricks:
- Store frequently used tools at eye level, not tucked away
- Keep like items together so returning feels obvious
- Use open bins for things you grab daily and lidded bins for seasonal supplies
- Avoid stacking more than two bins high if you need them regularly
- Keep a small trash bag or bucket for broken items so they don’t linger
If you live with family members, label in plain language. Not “hardware,” but “drill bits” or “hose parts.” If you rent and don’t want adhesive labels, use tags tied onto handles or bins.
This supports long-term Garden Shed Organization because it reduces the friction of putting things away, especially during busy garden weeks.
Conclusion
A shed that supports raised beds and power tools isn’t about fancy storage—it’s about a layout that matches how you actually use your yard. When you zone the shed, protect a clear path, and give gardening and tools their own lanes, Shed Organization starts to feel natural instead of forced.
Keep it budget-aware, keep it simple, and aim for a space that stays calm even when life gets busy. The best shed layout is the one that helps you step outside, do what you need to do, and come back in without feeling like you just wrestled a pile of stuff.