
It’s official: we’re entering pine cone season. You know, that magical stretch between early autumn and late winter when nature drops craft supplies right at our feet. And if your kids are like mine — always picking up “treasures” on the walk home — then you probably already have a basket of pine cones by the back door.
So, what do you do with them (besides trip over them)? Enter: the pine cone gnome craft — one of the cutest, easiest, and most delightful family activities you can do on a crisp fall afternoon.
No products found.
Click image to view on Amazon
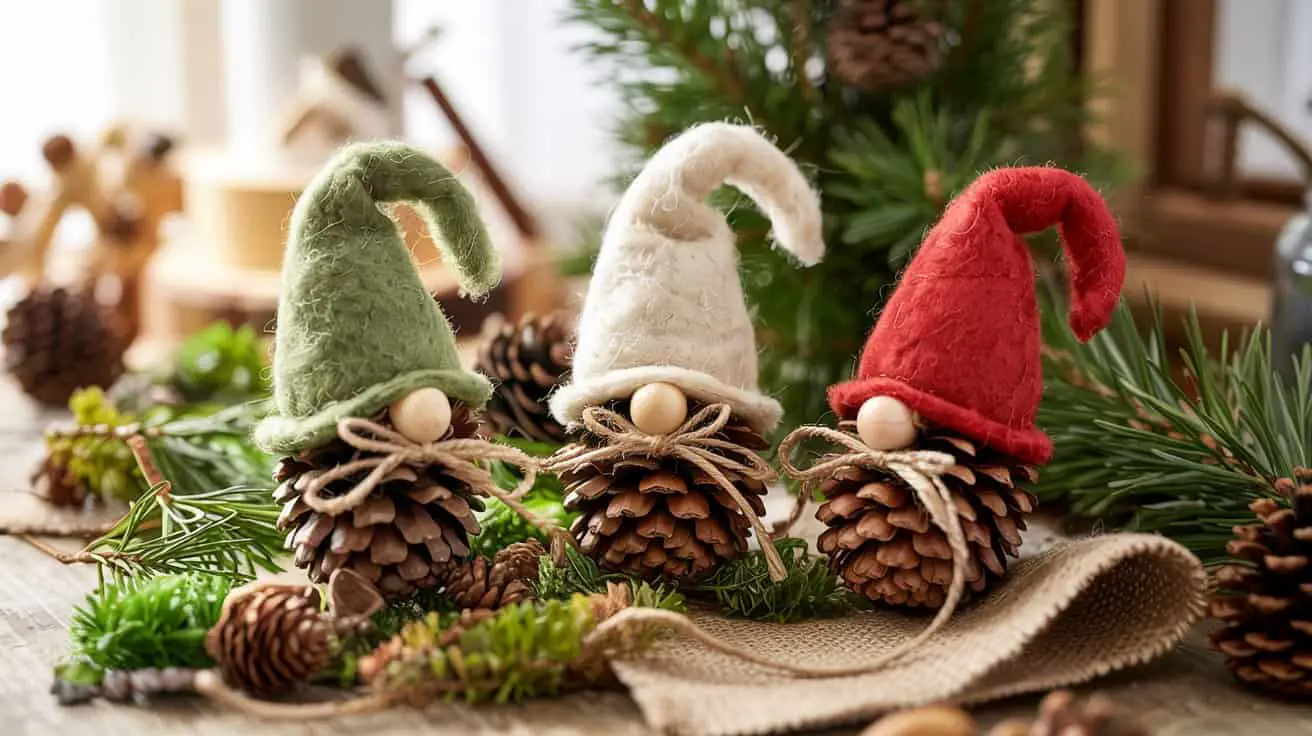
These whimsical little woodland characters are part craft, part nature project, and all heart. They bring a touch of Scandinavian charm to your home without needing fancy tools or a Pinterest degree in perfection. Whether you’re making one as a quiet afternoon craft or creating a whole gnome village for the mantle, these pine cone gnomes are perfect for all ages — and all attention spans.
Why Gnome Crafts Are Pure Magic

Let’s be honest. Some crafts are “for kids” in theory, but somehow you end up hot-gluing for three hours while your five-year-old eats glitter glue. Gnomes aren’t like that.
Here’s why gnome crafts just work:
- They don’t have to be perfect — actually, the more lopsided, the better.
- They’re great for hands-on texture play (soft felt, rough pine cone scales, fuzzy moss).
- The process is as calming as it is creative.
- And they make fantastic decor you’ll actually want to keep out past bedtime.
Plus, gnomes have serious cozy energy. Whether it’s fall harvest vibes or Christmas elves, they bring that quiet magic that kids — and let’s be honest, parents too — really need when the days start getting darker.
What You’ll Need (No Fancy Stuff Required)

You can absolutely grab most of this from your craft bin, the garden, or the seasonal aisle at Dollar Tree (shhh, your secret’s safe with me).
No products found.
Click image to view on Amazon
Basic materials:
- Pine cones (medium to large, firm and open are best)
- Wooden beads or pom-poms (for the nose)
- Felt or soft fabric scraps (for the hat and scarf)
- Craft glue or a low-temp glue gun
- Twine or string
- Cotton balls or wool roving (for beards)
- Optional: moss, mini acorns, tiny bells, faux berries, burlap
🪵 Bonus points if you add bark or seed pods for a “gnome forest floor” effect.
A Mini How-To (Kid-Friendly Version)

Here’s the general idea. Don’t worry about a strict step-by-step — this is more of a “set out the materials and see what happens” kind of craft.
Step 1: Prep Your Pine Cone
Give it a quick shake to remove any hidden bugs (you’ve been warned). You can leave it natural or spray it with a little white paint for a frosted winter look.
Step 2: Add the Beard
Glue a puff of cotton, yarn, or wool roving to the front bottom third of the cone. The pine cone’s natural shape holds it beautifully. You can even trim it to create different beard “styles.”
Step 3: Pop on the Nose
A wooden bead or brown pom-pom glued just above the beard makes the cutest little nose. Let it peek out from under the hat for the classic gnome look.
Step 4: Make the Hat
Cut a triangle of felt or fabric, roll it into a cone, and glue the edges together. Pop it on the top of the pine cone, slightly flopped or twisted for that whimsical Scandinavian flair. A little bell or pom-pom at the tip? Chef’s kiss.
Step 5: Tie a Bow or Scarf
Wrap a bit of twine or scrap fabric around the “neck” and tie it like a scarf or rustic bow. You can even give each gnome their own personality with buttons, bows, or mini accessories.
And there you have it — your first pine cone gnome!
Design Ideas for a Whole Gnome Family

If you want to take things further (and trust me, you will), try making a gnome village with these cute variations:
- The Forest Gnome – Add moss around the base and give them a tiny stick staff.
- The Christmas Gnome – Red felt hat, white glitter beard, and a sprig of holly or berries.
- The Baby Gnome – Use a smaller pine cone and mini pom-poms for the nose and hat.
- The Cozy Gnome – Wrap a mini felt blanket around them and set them by a “campfire” (aka LED tealight).
- The Gardener Gnome – Decorate with tiny faux mushrooms or tuck a mini rake in their arms.
It’s amazing how a bit of felt and a pine cone can suddenly become a character. Your kids will probably start naming them and giving them jobs around the house. (Don’t say I didn’t warn you.)
Where to Display Your Gnomes

These crafty little pine cone gnomes aren’t meant to be hidden away. They’re too cute not to show off.
Some cozy display ideas:
- Line your windowsill with a tiny gnome parade
- Create a fall centerpiece with burlap, moss, and faux pumpkins
- Hang them on the tree with a bit of string glued to the hat tip
- Build a fairy garden or mini gnome village in a planter box or tray
- Place one by your child’s bed as a little seasonal “guardian”
They’re also brilliant as teacher gifts, grandparent surprises, or DIY Christmas ornaments.
Keep the Fun Going: Gnome-Themed Play & Learning

Crafting is just the beginning. Once your pine cone gnomes are done, they can become part of your child’s pretend play or nature exploration.
Here’s how to keep the magic going:
- Write gnome stories together — who are they? where do they live?
- Go on a “gnome home” hunt outside (aka, finding hollow logs or tree stumps)
- Make gnome accessories like mini backpacks, tools, or tiny pets
- Use them in sensory play trays with rice, moss, acorns, and twigs
- Create a seasonal shelf and update your gnomes with new “clothes” for each holiday
Trust me, your kids will want to make at least ten.
Final Thoughts: Why This Craft Just Works
The best family crafts have three things: they’re simple, they’re tactile, and they let kids explore and create in their own way. Pine cone gnomes tick all those boxes — and then some.
They’re a way to slow down. To make use of what’s around you. And to create something that feels… well, a little bit magical.
So next time you find yourself kicking pine cones down the path, gather a few and turn them into something wonderful. Whether you’re five or forty-five, there’s something incredibly cozy about making your own little woodland friend.
Just don’t be surprised if one day you swear you saw it move.